We stock a large selection of ambulatory products. Our knowledgeable staff are ready to assist you make the best selection for your needs.
Categories of Ambulatory Products
- Cane-Standard
- Seat Cane
- Quad cane
- Ice Tip Attachments
- Crutches-Axilla
- Walking with Crutches
- Using the Stairs
- Forearm Crutches
- Gutter/Platform Crutch
- Gutter/Platform Attachment for Walker
- Replacement Tips
- Walker-Standard
- Walker-Four Wheel with Seat and Brakes
- Walker Accessories
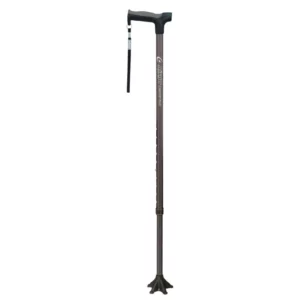
Standard Cane:
A standard one point cane is used to:
1. Provide balance,2. transfer weight, 3. increase stability when muscle weakness is present or to 4. provide added security when walking is compromised.
The cane is used on the side opposite of the weaker limb. This provides a greater distance between the cane tip and the weaker limb and increases the base of support and balance, thus decreasing the possibility of falling.
If you are considering using a cane you must have good arm, wrist and grip strength on at least one side. You should not require the cane to support more than about 25% of your weight.
There are different types of handles available. It is recommended to choose a handle that is comfortable and one that you feel secure using. For extra stability it is best to choose a handle that distributes your weight directly down the shaft of the cane. A derby or “T” handle does this very well.
To adjust a cane properly the person must stand straight and tall, hands at their side. Look straight ahead, not down and measure the handle to be level with their wrist. When holding the cane handle the elbow should have approximately a 30 degree angle. The shoulder should not be elevated but should be relaxed. Always consider the height of a cane if you change shoes. You may not need to adjust the cane but be aware this may need to be considered.
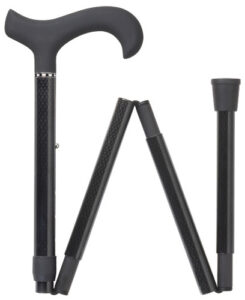
Canes are available in a large selection of colors and designs, in both traditional wood as well as light weight aluminum. Folding canes are convenient for traveling. Handles that glow in the dark or that have a light feature in the handle are always helpful when used in poor light or at night. Manufacturers have now come out with tips that are similar to a quad like configuration so they provide more stability. A one point cane can easily be converted to a quad like cane by simply changing the tip.

Offset Cane and MiniQuad tip
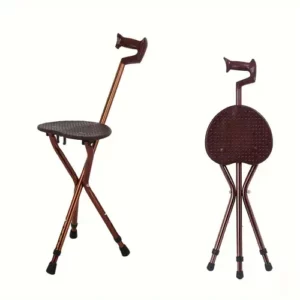
Seat Cane
A seat cane is an unique product that can serve two purposes. It can be used as a cane to assist you when walking, although it would not be chosen to be used simply for that. The second purpose is the convenience of being used as a seat, when you need a break. The seat is not built for comfort therefore is not designed to be used for an extended period of time.
There is no height adjustment to the seat cane. The weight restrictions vary depending on manufacturer. The seat may be round, square or be a hammock style. This is not a stock item.
Quad Cane
Quad canes are used when an individual requires more stability than a one point cane provides. They are available in a small base or a large base. The small base is used when less stability is needed and is easiest to use if needing to use the stairs. The large base provides more stability due to the wider base. The large base can be used on stairs but will need to be turned to fit the stairs, causing the handle to be turned as well. This may be difficult for someone who is unstable.
To adjust the height, have the person stand straight and tall. While the person is looking straight ahead, line up the handle with the crease in the wrist. The elbow should be at a 30 degree angle when holding the handle of the cane. The small or large base has a flat or flush side and this will need to be turned so it is closest to the person. This can be done by loosening the screw around the shaft of the cane, pushing the height adjustment button and turning the base around. There are two buttons so the button on the opposite side will click into place.

Ice Tip Attachments
During the winter months an ice tip attachment can be installed on any cane or crutch. This product prevents slippage by providing a spike like grip and is easily flipped up when not needed. Available in one prong or five prong. Easy installation using just a screwdriver.


Crutches-Axilla
Axilla (underarm) crutches are made of lightweight aluminum and have an adjustable push button mechanism. Axilla crutches are easy to adjust and best for short term use. Proper sizing is made by first selecting crutches that match the height of the individual. Most crutches come in a small adult, adult and tall adult height range. The height is indicated at each adjustment found on the shaft of the crutch but these are only a guide. It is recommended to confirm that the crutches are the correct height.
Let’s say the person is 5’9” and you adjust the crutch so the push button is in the 5’9” hole. You would still ensure the underarm (axilla) pads are two fingers below the axilla. The handgrip height is at the wrist. This is adjusted by removing the screw and moving the handgrip up or down as needed. The elbow should have approximately a 30 degree flexion.

How to use crutches:
Walking
To use the crutches it is important to have them adjusted properly first. To walk with them have them firmly in position. The axilla pad should be under the arms and the handgrip should be firmly grasped. It is important to not hang on the crutches with your axilla but to put your weight on to your hands and good leg.
The crutches are moved together about 12 inches in front of you. Firmly holding the handgrips and with the weight on your good leg, swing yourself forward so you are standing between the crutches. Repeat the process to move forward. Ensure the surface you are walking on is free of obstacles and is not slippery.
If using crutches when raining or snowing, it is important to make sure the crutch tips are clean and dry when walking inside. It is best to gently tap the ends on a carpeted area and twist them so the tips are cleaned. Check before you start walking that the tips are not slippery.
Using the Stairs
This can be done one of two ways. It is usually best when doing stairs to hold both crutches in one hand and hop on your good leg up or down the stairs. If this is not something you feel you can do then the other option is to use the crutches to support yourself as your good leg steps to the first step. Bring the crutches up and support yourself as you step to the next step and so on. Remember to lean slightly forward opposed to back.
Forearm Crutches
The forearm crutch is recommended for the individual who has good upper body strength. If you are an amputee or require the use of a crutch long term, these are the best choice. The C-cuff or collar that encircles the forearm allows use of hands without causing the crutches to fall away. The cuffs can be adjusted by simply bending and shaping as needed.
Adjusting the crutch is fairly simple to do. First adjust the height of the crutch so the handgrips are level with the wrist. To adjust the height of the C-cuff measure two fingers down from the bend in the elbow or 5 cms. The cuff fits over the fleshiest part of the forearm.
Using the crutch is the same as an axilla crutch. Move both crutches in front about 12 inches and using your good leg move your body so it is between the crutches. If it is difficult to support yourself to do this the other option is to do a four point gait. For example: If the right leg is affected you would move as follows: left crutch, right leg, right crutch, left leg. This provides the user with the maximum stability.
Gutter/Platform Crutch
The gutter crutch also may be called platform crutch is used when there are wrist or hand problems. The weight bearing surface used is the forearm area.
To adjust the height, hold the arm at a 90 degree angle. Adjust the height of the platform so it rests against the forearm and the hand is able to grip the handle. The shoulders should not be elevated. The position should be comfortable for the user.

Gutter/Platform Attachment for Walker
These can be attached to any walker that has an one inch tubing. It is needed when an individual has compromised hand and wrist strength due to an injury or arthritis. They are best attached to a standard folding walker.
To adjust the proper height, move the platform so the elbow is flexed at a 90 degree angle. The handgrip can be adjusted so the hand can grasp it comfortably. The shoulders should not be elevated as this would mean the platform height is too high.

Replacement Tips
Tips are the rubber ends you will find on canes, crutches and standard walkers. They provide a cushion and stability to the end of the walking device. It is important to regularly replace tips when they wear out. A worn out tip can be unsafe for the user and could possibly result in a fall.
The tips are sized based on the diameter of the tubing of the cane, crutch or standard walker. Remove the old tip and measure the diameter of the end. Once you have determined the measurement, you can select the correct tip size. The tip should fit snug otherwise it will fall off.
Walker Standard
A standard walker is made of lightweight aluminum. It can be easily folded for easy portability. Adjustable in height, this is a great choice for the individual that wants something smaller to use in a home with limited space. These walkers can be outfitted with 5” wheels and walker skis or glide brakes. Attachments allow the walker to glide along rather than needing to be picked up and moved with each step. It is not recommended to attach four wheels to this walker. There would be no mechanism to slow down or stop walker if it got away from the user.

Walker-Four Wheel with Seat and Brakes
The four wheel walker with seat allows the individual with mobility problems to have the security of being able to sit down if needed. The brake system located on the handles work similar to those found on bicycles. They provide the user with the ability to slow the walker down particularly if going down a hill or ramp.
These walkers have come a long way from the very first models. Available in a large selection of models, colours and sizes.


How to choose the appropriate four wheel walker?
A poorly fit or incorrectly prescribed walker could be difficult for the client to use, cause back pain or risk of injury from a potential fall. These are some tips that will help in selecting the right walker for you.
Handle Height:
To measure the correct handle height you stand with the walker and adjust the handles so they align with the hip joint. When the handle height is correct the arms should be bent at a slight angle, approximately 20-30 degrees. If the handles are set too high, the users shoulders will be raised higher than the natural position. If too low the user will tend to bend over rather than standing in a upright position.
Seat Height:
When sitting on the seat, your feet should be flat on the floor with the legs bent at the hip and knee. The client should be seated in a “perched” position opposed to sitting at a 90 degree angle. This allows the client to easily stand from a seated position. Remember: the seat is not intended for long periods of sitting or to be used as a wheelchair. Remind the user to engage the brakes in a lock position when sitting down on walker or getting up from the seated position.
Width:
When seated the client should be able to fit comfortably between the handles. If not, a wide model may need to be considered.
Walker Height:
It is always beneficial to consider who will be lifting the walker in to a vehicle. If it is the client, then a lightweight walker should be an option. If a family member or friend is doing the lifting, can they lift any weight walker or do you need to consider their limitations as well.
The following clinical conditions would benefit from using a four wheel walker:
Multiple Sclerosis:
A four wheeled walker can help in the initial stages when leg strength is reduced or balance is affected. The seat height would be critical, as to allow for frequent rest breaks during mobility.
Rheumatoid Arthritis or Osteoarthritis:
These conditions affect multiple joints of the lower extremities, including the hand grip to ensure reduced strain through the shoulder, elbow, wrist and hand. Any strain through these areas can be affected by the arthritic condition.
Softness or surface area of the hand grip will also affect the arthritic hand. In addition, seat height is critical as a seat that is low will increase the strain on the individual’s joints when moving to a standing position.
Parkinson’s disease:
A walker that is smooth rolling will decrease the effect of a “stuttering gait” which occurs when a person gets “stuck” and cannot move forward. The use of slow down brakes may be important to reduce the likelihood of the walker moving forward too quickly.